Friday 19 September 2014

How to Take Apart an HP Laptop

How to Take Apart an HP Laptop

Taking apart a HP laptop is sometimes necessary in order to keep the laptop in running condition. Whether it’s to clean out dust and debris or replace a part, dismantling a laptop is relatively simple.

How to Take Apart an HP Laptop thumbnail


Instructions

  1. How to Take Apart a HP Laptop

    • 1
      Turn laptop off. Unplug the power cord.
    • 2
      Turn the laptop over so the bottom is up and the rear panel is facing you.
    • 3
      Pop open the battery cover by sliding the release switch to the right. Lift the battery out of the laptop.
    • 4
      Unscrew and remove the two screws holding the hard drive cover into place. Remove the hard drive by lifting it out of the laptop using the notch at the top of the cover. Keep the hard drive and the cover in one piece unless you are replacing the hard drive.
    • 5
      Unscrew all of the screws found on the rear panel.
    • 6
      Turn the laptop right side up and open the top.
    • 7
      Slide the four keyboard release switched towards you. They are located above the keyboard. (On some models the keyboard release switches or screws are under a screen or cover; use your flathead screwdriver to pop this off to access the switches and release the keyboard.) Lift the top edge of the keyboard and flip it towards you so that the keyboard rests upside down over the mouse pad. Press down on the button in front of the keyboard cable to release the cable. Remove the keyboard from the laptop.
    • 8
      Unscrew the wireless antenna receivers which are located between the laptop screen and laptop base.
    • 9
      Unplug the DVI cable.
    • 10
      Unscrew the screws holding the cover to the laptop base. Remove the laptop cover.

Tips & Warnings

  • These instructions were created using an older HP Pavilion, however the basic principles apply to any Hp laptop. HP laptops vary in design so screws, latches and parts may be found in different places. If in doubt about where something is, check out the laptop’s manual. HP manuals can be found online, simply search using your laptop’s make and model.
  • If you take your HP laptop apart, your laptop will no longer be covered by the manufacturer’s warranty! If your laptop is still covered by Hewlett Packard’s warranty, take it to an authorized dealer for repairs.
  • When opening a laptop, always remove the battery and the hard drive first. The battery can still cause electrical shock even if the laptop is turned off. The hard drive is easily damaged and should be removed to protect precious data.

How to Repair an HP Laptop

How to Repair an HP Laptop

How to Repair an HP Laptop thumbnail
One of the most popular brand of laptop computers is the HP laptop. These computers are have a reputation for being long lasting and not needing many repairs. As good as this brand of computers might be, there still are occasions when you will need to do a few repairs to help your computer to stay in tip top running condition. One of the most common problems that occurs in laptops is having a screen get cracked or go bad and needs to be replaced. Another common problem is having a faulty power jack. Both of these problems can be fixed by hand with a little care and the right tools for the job.

Instructions

    • 1
      Close your laptop computer, flip it over and remove the battery. After you have removed the battery pack you will need to remove all the screws on the screen side of the computer. Remove a third screw that is located just under the battery in the middle of the computer. This is known as the keyboard screw. Place all the screws you use in separate plastic containers to keep track of them and to keep them organized.
    • 2
      Flip the computer back over and open the laptop back up. Hold the power button down for approximately 30 seconds to help make sure that all of the electric charge has been cleared out of the computer. Take your Philips screwdriver and remove the speaker bezel which is located just above the keyboard and right below the computer screen.
    • 3
      Disconnect all 6 wires connected to your laptop screen and speaker bezel. Your new screen will already have these particular wires attached to it, so all you have to do is disconnect the wires from the speaker bezel and not the actual screen itself. Remove the screws that are holding the hinges of the laptop screen to the body of the computer. Next, you will need to take your screwdriver and remove the keyboard screws, pull the keyboard up gently, and then carefully disconnect the main cable connecting the keyboard to the computer.
    • 4
      Disconnect the wireless antenna wires and remove them from the computer. Pay very close and careful attention how these wires are hooked up and how they are ran through the computer because your new wires will need to be hooked up the same way.
    • 5
      Take your brand new working computer screen and begin connecting and putting the laptop back together. Start by connecting the wireless antenna wires, and then reconnect the computer keyboard and screw it back in place.
    • 6
      Attach all the appropriate cables back in place on the speaker bezel on the laptop. Secure the hinges back in place and snap the speaker bezel cover back in place and screw it down. Flip the computer over and put the battery back in place and secure the screws firmly back in place.
    • 7
      Remove the motherboard from the laptop case (body). Take your soldering iron and desolder the power jack's connection to the motherboard.
    • 8
      Remove the power jack and begin cleaning the power jack and the motherboard. Make sure you use a very soft brush to clean away the dirt, dust, and other build up that may have gotten on the jack and motherboard.
    • 9
      Solder the power jack contacts to the motherboard. Once these connections have been made and soldered you can put the motherboard back into the laptop case.

How to Remove Files in Task Manager

How to Remove Files in Task Manager

If your computer suddenly slows down or seizes up during use, you can use the Windows Task Manager to try and isolate the problem. Usually this works, and you will avoid a crash. However, you may still lose any unsaved information in the malfunctioning program.


Instructions

    • 1
      Save any unsaved work, such as documents or spreadsheets, that you might currently be working on. Be patient; if your system is running slowly, this may take awhile.
    • 2
      Activate the Windows Task Manager by pressing down and holding <ctrl> <alt> <delete> on your keyboard, in that order. Make sure you only enter this sequence once. If you do it twice, you will reboot your computer.
    • 3
      Switch to the "Processes" tab inside the Task Manager. This will bring up a list of all the processes currently running in Windows. There should be two columns on the right-hand side, one titled "CPU" and one titled "Memory Usage."
    • 4
      Look in the "CPU" column to see if there is any process consistently using more than 80 percent of your CPU capacity. There will always be some natural spikes and dips in CPU usage as your programs run, but any process consistently running above 80 percent is likely slowing down your entire system.
      Shut down this process by selecting it and clicking "End Process" at the bottom of the window. If the process is unable to shut itself down after a few seconds, you will be presented with a window giving you the option to force it to shut down. Do so. If this fixes the problem, you should get your optimum computer performance back in a few seconds.
    • 5
      Look in the "Memory Usage" column, if the problem persists, for a process that is using much larger amounts of memory than any other program. Shut it down. This should restore your system performance. If not, you will need to reboot your computer.

Tips & Warnings

  • Shutting down these processes does not delete them from your computer. It just shuts them down. They will restart next time they are called upon.
  • Some processes are critical to the operation of Windows. If you shut one of those down, your computer will crash or reboot automatically. Therefore, take precautions to save your work before shutting down processes that you don't recognize.

How to Change What Programs Start on Bootup

How to Change What Programs Start on Bootup

Many programs and functions that load during your operating system's boot-up process are helpful. Sound utilities, laptop track pad settings, firewalls and anti-virus programs are all examples of software and features that enhance your computer experience. However, it is also possible for unhelpful or malicious software to run automatically on startup and slow down your machine's boot-up speed. The Windows System Configuration utility makes it easy to decide which programs start automatically when you turn on your computer.

Instructions

    • 1
      Open the System Configuration utility. Click the Windows Start button and select "Run." Enter "msconfig" and click "OK."
    • 2
      Add or remove startup programs and services. Click the tab labeled "Startup" within the System Configuration utility. Scroll down the list to see all of the programs and services that launch automatically each time your operating system starts up. Uncheck the box next to the name of a program to prevent it from starting automatically.
    • 3
      Confirm your changes. Click the "Apply" button, then click "OK" to exit the utility and save your new settings.
    • 4
      Restart your computer. Click the Windows Start button and select "Shut Down." Select "Restart" from the drop-down menu on the following dialog box and click "OK." The programs you removed from the boot-up process during Step 2 will no longer start automatically when your operating system launches.


How to Remove the Back of a Laptop


How to Remove the Back of a Laptop thumbnail

How to Remove the Back of a Laptop

Some laptop computers have removable backs that allow access to components such as the hard drive, memory or battery. If your laptop does not have a release latch for the battery or has a separate removable panel to access the memory or hard drive, you may need to remove the entire back of the computer.


Instructions

    • 1
      Power down the laptop and disconnect the power cable and any peripheral connections.
    • 2
      Close the laptop lid and carefully place the laptop face down on a flat surface.
    • 3
      Locate holding screws around the perimeter of the back of the laptop. Use the Philips head screwdriver to remove the screws. Note the location of each screw as you will need to replace them in the same order you removed them.
    • 4
      Lift off the back of the laptop. Some models may have holding clips under the backing. You may need to slide the back around or lift it towards one edge of the laptop to release the clips.


Tips & Warnings

  • Look for small compartment panels on the back. On some laptops these small removable panels allow access to the computer memory without having to remove the entire backing.
  • Always touch your hands to a non-electrified metal object to dicharge any static electricity which can harm computer components.

How to Check the CMOS Battery

How to Check the CMOS Battery


Introduction

A charged complementary metal oxide semiconductor battery is necessary to retain your computer's hardware settings and for the proper functioning of its operating system. Symptoms of a depleted CMOS battery can include system warnings, lost time settings or even unexpected shutdowns. Once you've recognized the symptoms, you can check the battery itself.
How to Check the CMOS Battery


Checking for Problems

Step 1:
Watch for a BIOS warning on startup. If your system is equipped with a CMOS battery monitor a warning message will appear when it's time to replace your CMOS battery. Most standard or home computer systems do not have this feature, however.
Step 2:
Look for incorrect or changing time settings. One function of the CMOS is maintaining system time. If the CMOS battery is failing, you may notice invalid times showing within the operating system, such as on the clock at the bottom right of your monitor. This symptom is confirmed if time resets after the computer system is restarted. Under these circumstances, the CMOS battery should be replaced.
Step 3:
Watch for unexpected computer shutdown or invalid hardware errors. The CMOS retains settings for your system's hardware, including hard drives and RAM. If these stored setting are not available during operation, the computer system can unexpectedly shut off. Check that all cables, both inside and outside the computer, are firmly attached. If cables are attached but symptoms continue, replace the CMOS battery.
Step 4:
Check the CMOS voltage. If you have a voltmeter or multimeter, the direct method of determining CMOS battery failure is to check the CMOS battery's voltage. Most new CMOS batteries produce 3 volts. When this voltage drops below 2.5, problems can appear. If the battery's voltage drops below 1.8 volts, CMOS battery failure is imminent.


Replacing the Battery

Step 1:
Record the CMOS settings before you remove the battery. When your CMOS battery is removed, hardware settings stored in the CMOS will be lost. To record these settings, boot up your computer and enter the BIOS utility. Pressing the "Delete" or "F10" key during startup on most systems will start the BIOS utility; if this doesn't work, consult your computer's manual for the correct procedure. Write down any customized settings, such as hard drive configuration, CPU speed adjustments and external port deactivation.
Step 2:
Shut off the computer and then remove the external cover using a Phillips screwdriver. Attach an antistatic wrist-strap clip to the case housing. This will discharge any static electricity and preserve the computer's delicate electronics. Unplug the AC power cable from the power supply.
Step 3:
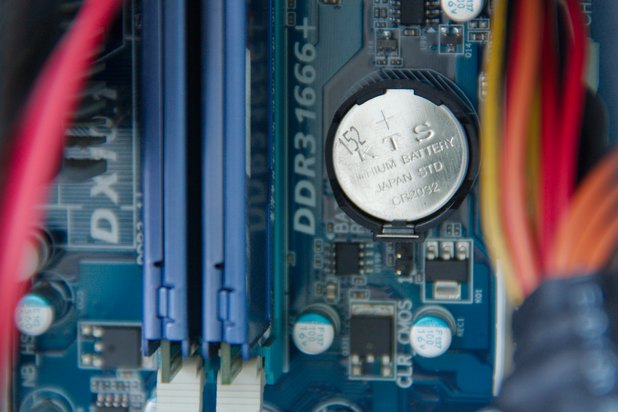
Locate the CMOS battery on the motherboard. Remove any peripheral cards or cables that obscure access. Using a jeweler's flat-blade screwdriver, slowly pry back the metal holding clip while lifting the CMOS battery with your fingernail.
Step 4:
Check the voltage of the CMOS battery. Determine positive and negative polarity by the plus or negative sign engraved on top of the battery. Set the voltmeter to the lowest range above 3 volts. Apply the positive multimeter lead to the positive side and negative lead to the negative side. Read the voltage. If the meter reads below 2.5 volts, replace the CMOS battery.
Step 5:
Install a new or functioning CMOS battery by pressing it firmly into the battery casing until the metal holding clip snaps into place. Replace any removed peripheral cards or cables. Replace the computer case and reattach the power cable.
Step 6:
Restart the computer and enter the BIOS. Select "load default BIOS settings" and then reconfigure the customized settings you wrote down earlier. Save settings and exit the BIOS utility.

Tips & Warnings

  • CMOS-type batteries are often used in cameras and small electronics. Replacement batteries can be purchased at photo counters, drug stores, electronics stores or online. Compare engraved serial numbers before purchasing.
  • Remove power and discharge static electricity before touching delicate electronics.